Twitch emotes are a huge part of how streamers and their communities express themselves. Whether you’re reacting to a clutch play, a hype moment, or a bad pun, emotes are the language of Twitch chat.
In this guide, you’ll learn the exact Twitch emote sizes, formats, and design tips to help you create bold, eye-catching emotes that stand out. If you want a full breakdown of all Twitch graphic dimensions, check out our Twitch Graphic Size Guide.
You’ll also get access to a free emote template and a Twitch Emote Resizer to make the process even easier.
🧠 What Are Twitch Emotes?
Twitch emotes are small custom images that viewers use in chat to react, respond, and express themselves. They’re a core part of Twitch culture and help build a stronger connection between streamers and their communities.
Unlike standard emojis, Twitch emotes are unique to each channel. Streamers can upload their own designs, giving subscribers exclusive access to emotes that reflect the personality and vibe of the stream.
If you’re looking for inspiration, check out our full collection of custom emote designs to see what’s possible.
📏 Twitch Emote Size Requirements
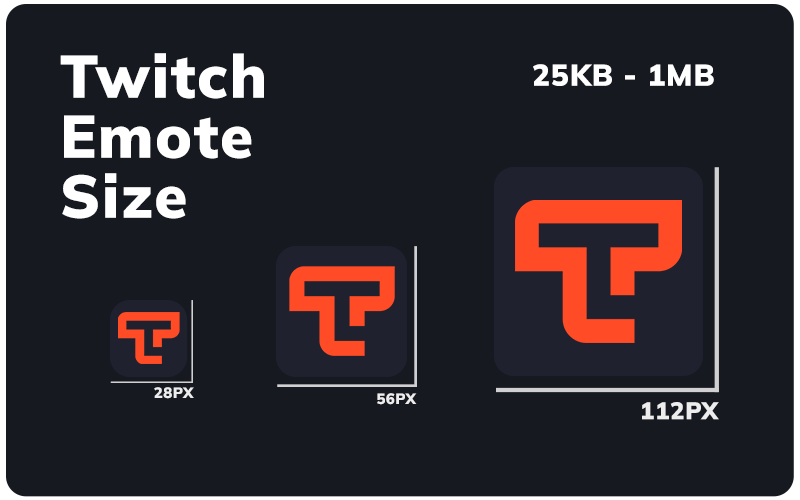
Twitch emotes must be uploaded in three sizes: 28×28, 56×56, and 112×112 pixels. These are used in different parts of the platform like chat, hover previews, and the emote picker.
For static emotes, Twitch requires PNG format with a transparent background. Each file must be under 25KB.
For animated emotes, use GIF format. The total file size must be under 1MB, with no more than 60 frames, and the animation must loop smoothly. Animated emotes must also include all three required sizes.
To maintain clarity, always design your emotes at a larger canvas size (like 1120×1120 px), then scale them down manually. This ensures sharp results and avoids the quality loss that can happen with Twitch’s auto-resize option.
Emote Size Table
| Emote Size | Used For |
|---|---|
| 28 × 28 px | Chat display |
| 56 × 56 px | Hover previews |
| 112 × 112 px | Emote picker and high-res views |
| Static format | PNG, transparent background, max 25KB |
| Animated format | GIF, max 1MB, 60 frames, must loop |
🛠️ Best Canvas Size to Start With
Design your emotes at a large resolution to maintain quality when scaling down.
Recommended setup:
- Canvas: 1120 × 1120 px
- Format: PNG, transparent background
- Optional: 300 DPI for cleaner export
Resize tips:
- Export clean versions at 112px, 56px, and 28px
- Preview your emote at 28px before uploading
- Avoid tiny details or thin lines that won’t scale
🎨 Tips for Great Emote Design
Twitch emotes show up as just 28px wide in chat. They need to be bold, clear, and packed with personality. Use these tips:
🔍 Focus on clarity
Use bold shapes and clean outlines.
😄 Exaggerate expressions
Overemphasize facial features or reactions.
🎯 Keep text minimal
Stick to a single large letter or two at most.
🎨 Stay on-brand
Match your stream’s color palette and vibe.
Want pro-looking emotes fast? Grab one of our custom emote packs or download our free template below.
💡 Animated Emote Size Guidelines
Animated Twitch emotes follow the same dimensions but require different formatting.
Twitch requirements:
- 28 × 28 px
- 56 × 56 px
- 112 × 112 px
- File type: GIF only
- Max file size: 1MB
- Max frames: 60
- Must loop smoothly
Pro tips:
- Keep animation simple
- Avoid flashing or strobe effects
- Test at 28px to ensure clarity
📦 Free Twitch Emote Template
Speed up your workflow with our free emote size template.
What’s included:
- PSD file with smart objects
- Transparent PNGs at all three sizes
- Built-in safe zones and size guides
Great for beginners or advanced users who want a clean export setup.
🚀 How to Upload Emotes to Twitch
Once your emotes are ready, uploading is simple:
- Once your emotes are ready, uploading is simple:
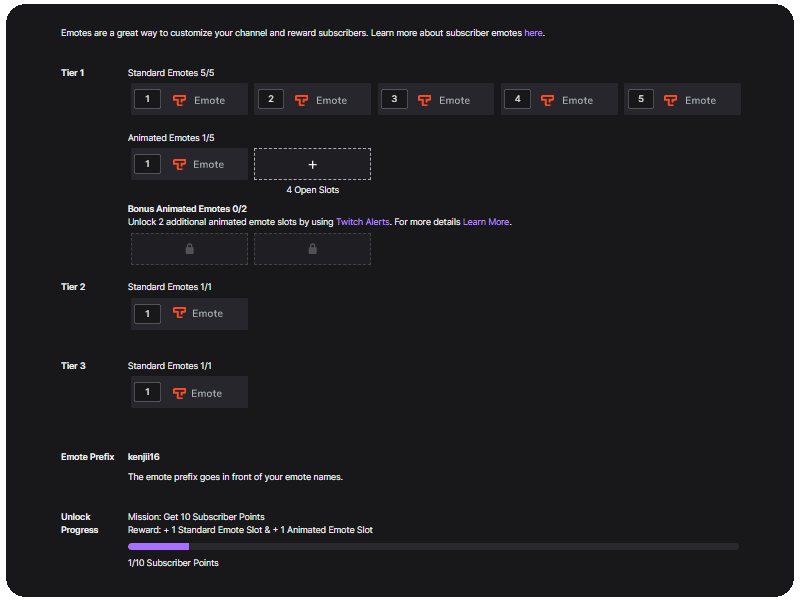
- Go to your Twitch Creator Dashboard
- Click Viewer Rewards > Emotes
- Choose the emote slot
- Upload 112px, 56px, and 28px versions
- Assign an emote code (like
LIONHYPE) - Submit for approval
Twitch Tips:
- Keep files under 25KB
- Use transparent PNG or GIF only
- Don’t upload copyrighted or blurry images
🚀 Try Our Free Twitch Emote Resizer
Need a fast way to generate perfectly sized Twitch emotes? Try our Twitch Emote Resizer. It’s a free tool that resizes your PNG or JPG to all three required dimensions (28px, 56px, and 112px) in one click. No login needed. Just upload, download, and you’re done.
Whether you’re preparing static emotes or want a reliable export before animation, it’s the easiest way to streamline your workflow.
🤔 Twitch Emote FAQ
What size is a Twitch emote?
Twitch emotes must be uploaded in 28×28, 56×56, and 112×112 px PNGs with transparent backgrounds.
What size should I design at?
Start large — 500×500 or 1120×1120 px — then scale down to preserve clarity.
Why does my emote look blurry?
Blurriness usually comes from scaling up or using too much detail. Stick to bold shapes and test at 28px.
Can emotes be animated?
Yes. Upload GIF files at the same dimensions with no more than 60 frames and a 1MB max size.
How long does Twitch emote approval take?
Anywhere from a few minutes to 48 hours. Partners often get faster reviews.
Where can I resize my emotes automatically?
Use our Twitch Emote Resizer to instantly generate all three required sizes.
🔗 More Resources
Looking for more help with Twitch graphics? These guides cover everything:
Each one includes design tips, file format specs, and downloadable templates.